

Whether it’s with time-honored recipes or new favorites, baking can bring the family together and fill your home with smiles. From our homes to yours here are some of our favorite recipes. We hope that they become some of yours too.
*Ingredients listed in bold are available at Bartell’s. Stock levels may vary per store.
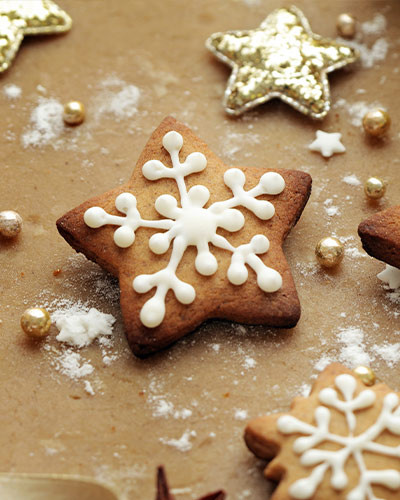
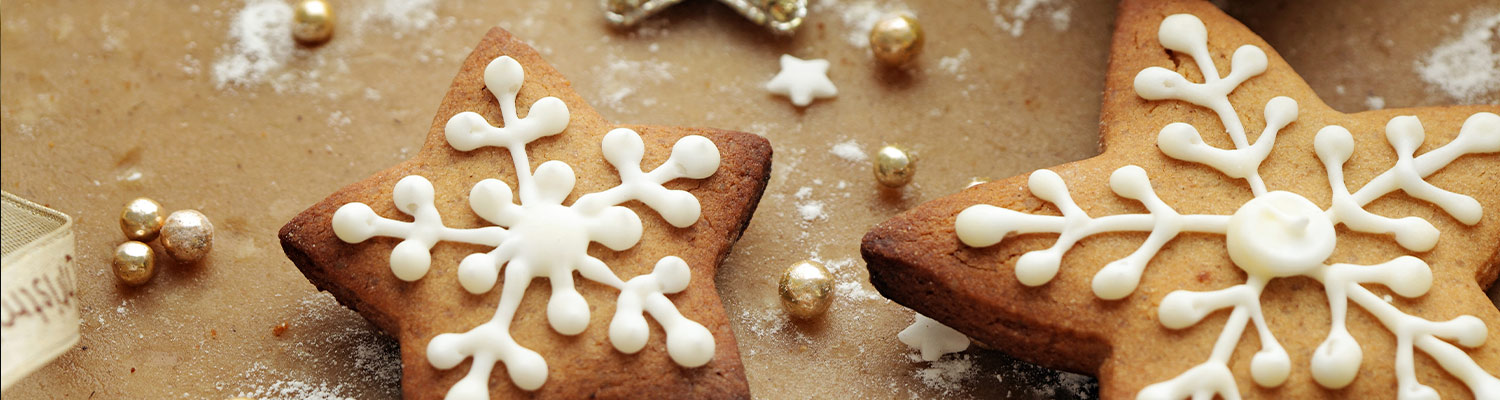
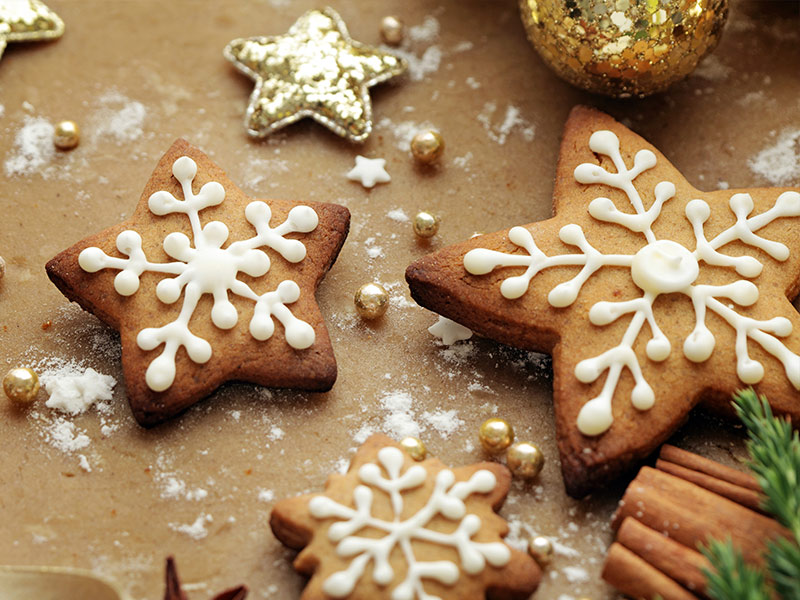
Snowflake Gingerbread Cookies
Makes 4 – 6 servings
Ingredients:
4 cups all-purpose flour
1 teaspoon salt
1½ teaspoons baking powder
½ teaspoon baking soda
1 teaspoon ground cinnamon
1 teaspoon ground cloves
2 teaspoons ground ginger
1 teaspoon ground nutmeg
226 grams/8 ounces unsalted butter, at room temperature
1 cup sugar
1 cup molasses
1 large egg
In the bowl of a stand mixer fitted with the paddle attachment, cream together the butter and sugar on medium-high speed until light and fluffy, about 2 minutes. Mix in the molasses and egg until combined. Add in the dry ingredients and mix just until incorporated. Cover the bowl and chill the dough for at least one hour.
Preheat the oven to 180c/350f. Line baking sheets with parchment paper. Roll the dough out on a lightly floured work surface to about ¼-inch thickness. Cut into shapes with cookie cutters. Place the cookie shapes onto the prepared baking sheets, about 2 inches apart. Pop back in your freezer for 10 minutes to chill further and then bake for 10 minutes, rotating the pans halfway through baking.
Remove from the oven and let cool on the baking sheets for 10 minutes. Transfer to a wire cooling rack and let cool completely. Decorate as desired.
Royal Icing
4 cups powdered sugar, sifted
2 tbsp. meringue powder
5 tbsp. water
Combine all ingredients in the bowl of a stand mixer fitted with the paddle attachment. Mix on low speed until the sheen has disappeared and the icing has a matte appearance (about 7-10 minutes). Add water slowly, a very small amount at a time and stir by hand until combined. Continue until the icing has reached a consistency appropriate for piping. Using a pastry bag, pipe your design on each cookie and let stand for several hours (1 – 2 hours) to set. Ensure you keep the leftover icing covered at all times when not in use so that it does not begin to harden. Remember if the icing is too thick, to thin it with water and if it becomes too thin, then thicken it with icing sugar (confectioners sugar). Also, if you would like to color your icing, then gels are the best option.
Source: http://intheknowmom.net/snowflake-gingerbread-cookies/
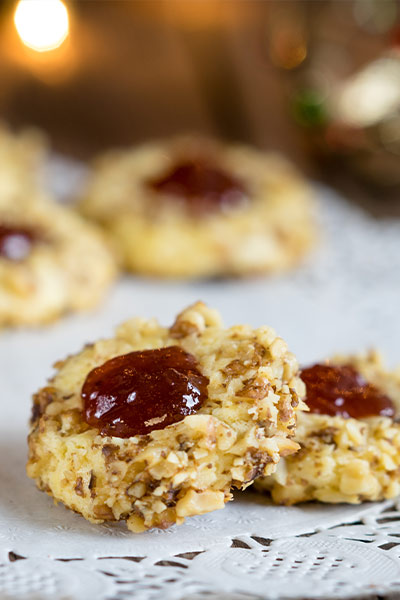
Thumbprint Cookies
Makes 12 servings
Ingredients:
½ cup butter, softened
¼ cup packed brown sugar
1 egg
½ teaspoon vanilla extract
1 cup all-purpose flour
¼ cup finely chopped walnuts
⅔ cup Maury Island or Bonne Maman Jam
¼ teaspoon salt
Separate egg, reserving egg white. Cream butter or margarine, sugar, and egg yolk.
Add vanilla, flour and salt, mixing well.
Shape dough into balls. Roll in egg white, then walnuts. Place on cookie sheets about 2 inches apart. Bake for 5 minutes.
Remove cookies from oven. With thumb, dent each cookie. Put jelly or preserves in each thumbprint. Bake for another 8 minutes.
Source: https://www.allrecipes.com/recipe/9618/thumbprint-cookies-i/
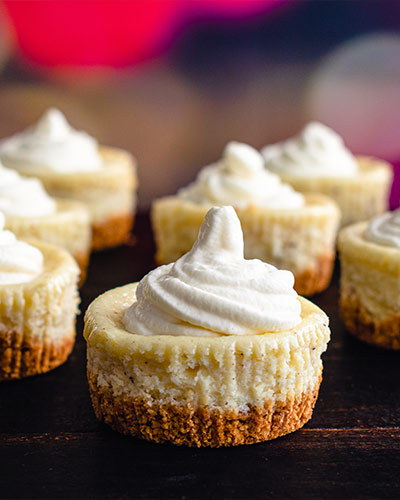
Mini Eggnog Cheesecakes
Makes 12 servings
Crust Ingredients:
1 cup graham cracker crumbs
2 tbsp unsalted butter, melted
1/2 tbsp granulated sugar
1/4 tsp nutmeg
Cheesecake Ingredients:
12 oz. cream cheese, room temperature
1/2 cup granulated sugar
1/2 cup eggnog
1 tbsp all purpose flour
1/2 tsp vanilla extract
1/4 tsp nutmeg
1/4 tsp salt
1 large egg
In a food processor or large bowl, combine crust ingredients. Divide evenly between prepared cheesecake cavities. Firmly press down to create and even crust. Bake for 5 minutes.
Reduce oven temperature to 325°F.
Meanwhile in a large bowl or stand mixer, beat together sugar and cream cheese. Add eggnog, flour, vanilla, nutmeg and salt. Mix until well blended. Add egg, mixing only until just combined. Fill cavities 3/4 full. Bake for 15-18 minutes or until centers are only slightly jiggly. Remove to a wire rack to cool for 1 hour. Transfer to refrigerator to chill 4 hours or overnight.
Serve with fresh sweetened cranberry puree, sweetened whipped cream and a dusting of nutmeg. Store leftovers in the refrigerator.
Source: https://www.bakedbyrachel.com/mini-eggnog-cheesecakes/
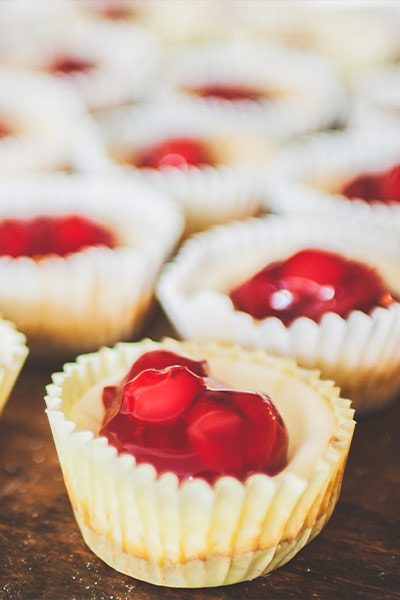
No Bake Mini Cheesecakes
Makes 30 servings
30 mini cupcake foils (1 1/4 inch wide)
30 mini vanilla wafers
1/3 cup fresh lemon juice
1 package unflavored gelatin
16 oz cream cheese (room temperature)
1 cup sugar
1 cup sour cream (room temperature)
1 tbsp vanilla extract
Cherry pie filling
Pour the gelatin over the lemon juice and let stand for 5 minutes.
In a large mixing bowl beat the cream cheese until smooth. Add the sugar and beat until incorporated.
Microwave the gelatin/lemon juice mixture for 30 seconds until the gelatin dissolves. Pour this gelatin/lemon juice mixture over the sour cream along with the vanilla and mix.
Add the sour cream mixture into the large bowl of cream cheese and mix until well incorporated into the cream cheese.
If serving that day: Fill each foil with approximately 1tbsp of the mixture. Refrigerate for 3 hours until set. Top with 1 tsp of cherry pie filling. If serving at a later date: Fill each foil with approximately 1tbsp of the mixture. Store in an airtight container and freeze. Move the refrigerator 4 hours before serving. Top with cherries right before serving.
Source: https://bakerbettie.com/holiday-party-made-easy-part-3-no-bake-mini-cherry-cheesecakes
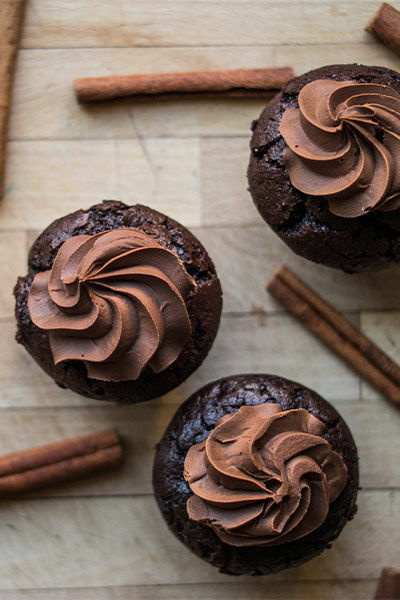
Red Wine Chocolate Cookie Cups
Makes 4 servings
Cookie Ingredients:
2¼ cups all-purpose flour
⅔ cup unsweetened cocoa powder
1 teaspoon baking soda
¼ teaspoon salt
1 cup (2 sticks) unsalted butter, softened
¾ cup granulated sugar
⅔ cup packed brown sugar
1 teaspoon vanilla extract
2 eggs
1 cup semi-sweet mini chocolate chips
Frosting Ingredients:
½ cup (1 stick) unsalted butter
⅔ cup unsweetened cocoa powder
3 cups powdered sugar
⅓ cup red wine
1 teaspoon vanilla extract
In a separate large bowl with a mixer, beat butter and sugar until combined and fluffy. Beat in vanilla. Add eggs, one at a time, beating after each addition.
Gradually add flour mixture to butter mixture, beating on low until just combined. Stir in chocolate chips.
Refrigerate dough for 30 minutes to overnight.
Preheat oven to 350F degrees. Spray 12-cup mini muffin tins with cooking spray and set aside. [Note: Since I only have 2 12-cup mini muffin tins, I typically either bake them in 2 batches or else make half the recipe].
Divide cookie dough into 48 portions, and roll into balls. Place each ball into prepared mini-muffin tin. Bake for 9 to 11 minutes. Remove from oven and let sit in pan to cool for 2 minutes. [Note: cups will form a natural indentation once removed from the oven] Carefully ease cookie cups out of pan using a knife and place on wire rack to cool completely.
FROSTING: melt butter and then stir in cocoa powder until combined. Using an electric mixer, alternately beat in powdered sugar and wine until desired frosting consistency. Stir in vanilla extract. Pipe into the center of cookie cups and decorate as desired.
Source: https://www.alidaskitchen.com/2014/12/07/red-wine-chocolate-cookie-cups-recipe/
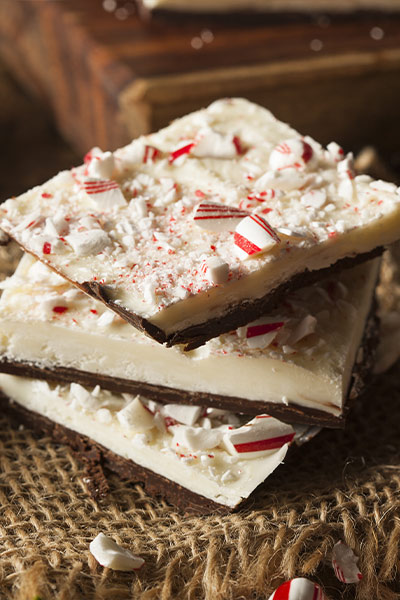
Peppermint Bark
Makes 8 – 10 servings
12 ounces good-quality semisweet chocolate, chopped into 1/2-inch pieces
1 1/2 teaspoons peppermint extract
1 pound good-quality white chocolate, chopped into 1/2-inch pieces
3 candy canes or 12 round hard peppermint candies, crushed
Put all but 3/4 cup of the semisweet chocolate in a heatproof bowl. Set the bowl over the saucepan of steaming water (do not let the bowl touch the water) and stir until one-third of the chocolate is melted. Remove the bowl from the saucepan; keep the steaming water over low heat. Gradually stir the reserved 3/4 cup semisweet chocolate into the bowl, a few pieces at a time, until all of the chocolate is melted. Return the bowl to the saucepan, 5 to 10 seconds at a time, to help melt the chocolate, if needed. Do not rush this step: It may take up to 10 minutes to melt the chocolate.
Wipe off any moisture from the bottom of the bowl. Stir 3/4 teaspoon peppermint extract into the chocolate, then quickly pour into the prepared baking dish and spread in an even layer. Firmly tap the dish against the counter to remove any air bubbles. Set aside at room temperature until almost set, about 10 minutes.
Meanwhile, put all but 1 cup of the white chocolate in a large heatproof bowl and repeat the melting process over the steaming water; dry off the bottom of the bowl. Stir in the remaining 3/4 teaspoon peppermint extract; pour over the semisweet chocolate and spread in an even layer. Sprinkle immediately with the crushed candy canes, gently pressing them into the white chocolate. Set aside at room temperature until firm, about 1 hour. Lift the bark out of the pan using the foil and break it into pieces. Store in an airtight container at room temperature for up to 2 weeks.
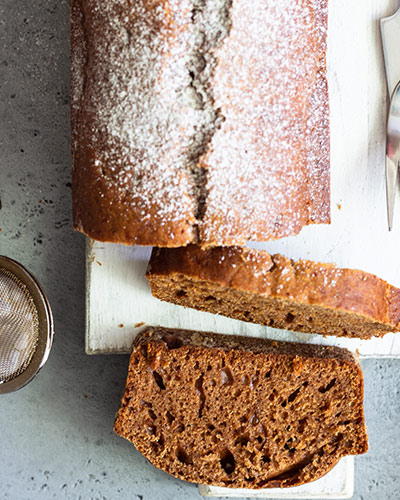
Gingerbread Loaf Cake
Ingredients:
1 1/2 cups all-purpose flour
1 tablespoon ground ginger
1/2 teaspoon baking soda
1 teaspoon ground cinnamon
1 teaspoon kosher salt
1/4 teaspoon ground allspice
1/4 teaspoon ground cloves
1/2 cup buttermilk
2 teaspoons vanilla extract
8 tablespoons unsalted butter (1 stick), at room temperature
1 cup packed dark brown sugar
1/2 cup dark molasses
2 large eggs, at room temperature
1 tablespoon fresh grated ginger
Combine flour, ginger, baking soda, cinnamon, salt, allspice, and cloves in a large bowl and whisk well, set aside. In a separate bowl, stir together buttermilk and vanilla until combined.
Combine butter and brown sugar in the bowl of a stand mixer fitted with a paddle attachment. Beat on medium speed until light in color and fluffy, about 5 minutes. Beat in molasses until well combined then add eggs, one at a time, beating after each addition until well incorporated.
Stop mixer and scrape bowl and paddle (mixture will look separated and curdled). Add one third flour mixture beating on low speed just until flour is incorporated. Add half buttermilk mixture and once batter is smooth add another third flour mixture. Add remaining buttermilk and mix until incorporated. Add remaining flour mixture, and beat until incorporated and smooth. Fold in fresh grated ginger with rubber spatula.
Pour into prepared pan. Bake until a toothpick inserted in the middle comes out clean and cake is pulling away from sides of pan, about 45 minutes (mine took 55 min). Cool cake in pan for 10 minutes and then turn out onto a rack to cool completely.
Source: https://pixelsandcrumbs.com/blog/2014/12/4/gingerbread-loaf-cake
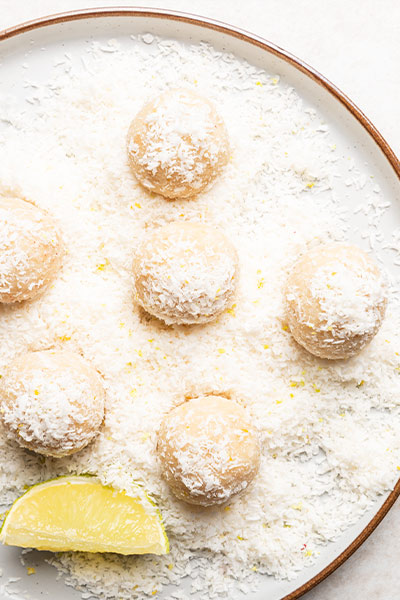
Lemon Coconut Cookie Balls
Cookie Ingredients:
¾ cup butter
½ cup white sugar
1 egg
1 teaspoon of vanilla
1 Tablespoon of almond extract
1 cup flaked coconut
2 cups flour
½ teaspoon of cream of tartar
Frosting Ingredients:
¼ cup butter
1 tbsp lemon zest
Pinch of salt
2 Cups of powdered sugar
2 tbsps of lemon juice – more if prefer lemony
Add egg, vanilla, almond extract, coconut, flour and cream of tarter and mix well.
Shape into small one-inch balls and bake at 350F for 8 – 10 minutes.
Add frosting once cookies are cooled.
Bartell’s original recipe.
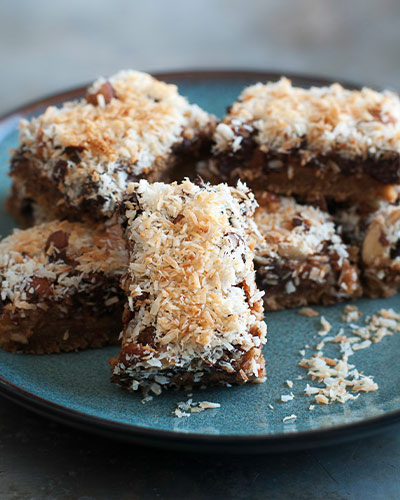
Magic Bars
Makes 1 9×13 pan
Ingredients:
2 cups graham cracker crumbs
1/2 cup (1 stick) melted unsalted butter
14 ounces (1 can) sweetened condensed milk
1 cup semi-sweet chocolate chips
1 cup butterscotch chips
1 cup chopped pecans
1 cup shredded sweetened coconut
1 teaspoon flaky sea salt (like Maldon), optional
Make the graham cracker crust:
Place the graham cracker crumbs and the melted butter in a bowl. Toss with a fork until the crumbs are moist and hold together when squeezed with your hand.
Dump the crumbs in the middle of the pan and then press them into an even layer with your fingers or the back of a flat-bottomed cup.
Pour the sweetened condensed milk over the graham cracker crust:
Spread to edges of the pan with a spatula.
Layer on the rest of the toppings:
In this order, sprinkle the chocolate chips, butterscotch chips, pecans, and then sweetened coconut over the top of the condensed milk.
Gently press the ingredients down with your palm so they stick to the condensed milk.
Bake in the oven for 30 to 35 minutes or until the edges of the bars turn golden-brown and start to pull away slightly from the sides of the pan. Remove from the oven and sprinkle with the sea salt (if using).
Cool completely before lifting the bars out of the pan using the parchment paper. (Stick them in the fridge for a few hours or overnight if needed to help firm up.) Cut into 24 pieces and store in an airtight container with wax paper or parchment paper between layers.
The flavor of the bars is even better the day after baking. Bars stored at room temperature will be fairly soft and are best eaten within 3 to 5 days. For firm and chewy bars, store in the fridge for up to a week.
Source: https://www.simplyrecipes.com/recipes/magic_bars/
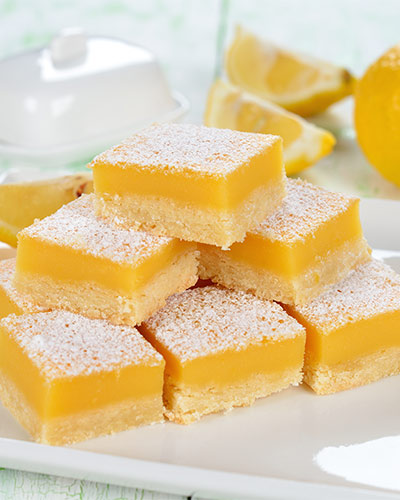
Lemon Bars
Shortbread Crust Ingredients:
1 cup salted butter softened
2/3 cup granulated sugar
2 cups all-purpose flour
Lemon Filling Ingredients:
3 eggs
1 1/2 cups granulated sugar
1/4 cup all-purpose flour
1/3 cup fresh lemon juice
1 tablespoon lemon zest
Preheat oven to 375 Degrees F. Prepare a 9 X 13 cake pan by spraying with baking spray. Alternatively, line the baking pan with parchment paper then cover with baking spray.
Combine all shortbread crust ingredients in a small bowl. Using a pastry cutter, 2 butter knives, or fingers, mix until crumbly.
Sprinkle crumbs evenly in cake pan.
Using the bottom of a cup, or a measuring cup, pat down the crumbs until they are even and smooth.
Place cake pan into preheated oven and bake for 20 to 25 minutes or just until the edges of the shortbread crust are beginning to brown.
Remove from oven and reduce temperature to 350 Degree F.
Lemon Filling
In a bowl, mix eggs and sugar until well combined. Add flour and mix until there are no lumps.
Add lemon juice and lemon zest, mix until well blended.
Pour over top of warm to the hot crust.
Place into 350 Degree F oven.
Bake for 18 to 22 minutes or until topping no longer looks wet.
Remove from oven.
Allow lemon bars to cool for at least 30 minutes.
Place into refrigerator until the bars are completely cooled and set, about an hour.
Once set and cooled, cut into desired size and shape. Lemon Bars may be sprinkled with powdered sugar and lemon zest after completely cooled.