

Expensive makeup brands aren’t necessary to achieve a gorgeous look. To prove it, two of our staff members created these festive holiday-inspired looks with some of their favorite go-tos plus a few products they’ve never tried before. Follow along as Tanya and Tori show you how to achieve these looks and give product reviews on items available at your local Bartell’s.
Classic Holiday Red

 Tanya: Let me just start by saying that I am not a professional makeup artist by any means. So I promise that my two looks in this blog are achievable for anyone! To start, using the L’Oréal Blend Artist foundation sponge, I put L’Oréal True Match foundation in Classic Ivory all over. Then I used Maybelline Fit Me Concealer in Fair under my eyes. (As you can see, I’m pretty pale.) True Match foundation is my go-to for 3 reasons: It goes on smoothly in a thin layer and doesn’t feel ‘cakey’, it has SPF 17 which helps to protect your skin, and of the different brands I’ve tried it really does match my skin tone the best! Once foundation was complete, I swiped a quick layer of the matching L’Oréal True Match Mineral Makeup to reduce shine. I usually only use either liquid or powder foundation, but if I’m doing something that lasts all day, I may swipe a quick layer of the powder over the top. Otherwise, you can also use a finishing powder or spray. Next step was my eyes. I unfortunately waxed the daylights out of my eyebrows in the early 00’s as was the style at the time, so these days filling in my brows is a must. The Revlon Colorstay Brow Creator was a new one for me. I really liked that it’s both a pencil and a powder, so you can line as lightly or fill in as heavily as you want. Good rule of thumb is if you take an eyeliner pencil and hold it up to the base of your nose and make a straight line past the outer edge of our eye up to your brow bone, that is where your natural eyebrow should end. After applying primer on my eyelids, I used the Covergirl Eye Enhancers Eye Shadow palette in Country Woods, with the lightest tone applied to my lids and the medium brown on the left in my crease.
 I decided to go light on the eyes so that they wouldn’t overshadow the bold red lips. Since this was for a holiday look, I wanted to add a layer of shine to my lids with L’Oréal Infallible Eye Shadow in Iced Latte. I love this eyeshadow. It glides on super smooth and is super shiny! I find that using my finger to apply is the easiest to get it to go on evenly.
Using Flower Beauty Liquid Eyeliner in Onyx Ink, I created the traditional cat eye winged liner. For me, the most difficult part of makeup is drawing on identical winged liner for both lids. But with patience and practice, it’s doable! I promise. Some people use makeup tape or a straight edge to assist with straight lines.
 I wanted to add a little bit of ‘subtle Christmas’ to my look, so using Kokie Velvet Smooth Eyeliner in Forest Green, I added a thin liner just under the outer half of my bottom lash line and followed it up through the winged liner to the edge. The green is quite dark, so it is hard to capture in a photo, but this eyeliner is maybe the smoothest eyeliner in existence. I’m absolutely going to buy it in other colors.
After a quick swipe of mascara, I put on the Ardell Extension FX Lashes to add some length and definition.
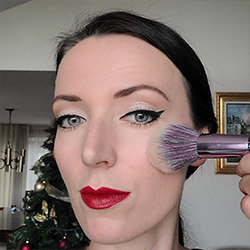 I was in desperate need of a new red lip liner and lipstick, and Maybelline did not disappoint! Using Maybelline Color Sensational Lip Liner in Very Cherry, I outlined my natural lips, then filled them in with Maybelline Super Stay Matte Ink in Pioneer. The liner was super smooth and easy to work with, and the matte lip color stayed on without a smudge for the rest of the day. The final step was adding a bit of blush with Maybelline Fit Me Blush in Peach, and to give it a little holiday glow, I brushed a light layer of Kokie Soft Glow Highlighter in Gleaming on my cheekbones. And voila!
Smokey Emerald Green

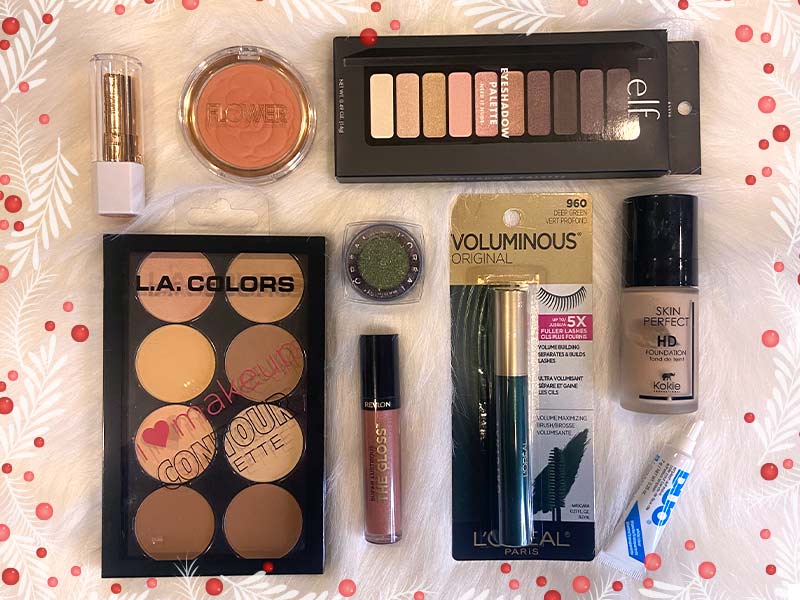
Tori: For a long-lasting look that will stand up past midnight on New Year’s Eve, start with a primer. This helps fill in your pores and fine lines to give you a flawless base and gives your makeup something to stick to. I enjoy this ELF Poreless Putty Primer because it is a dupe for Tatcha’s poreless primer that retails for over $45 more! Once your base is on, apply your foundation. I prefer to use a foundation brush with a paddle to help achieve a fuller coverage look. If you like a lighter hand, a sponge will give you that affect. Kokie has many colors of Skin Perfect HD Foundation, and they easily note whether the color is warm “W” or Cool C”. My color, 20w, is a warm color. A lot of people have trouble knowing what undertone they are. One easy trick is to figure this out are to look at your veins. If your veins look blue or purple, you have cool skin. If they look green or greenish blue you have a warm skin tone.
Next, I focused my concealer on the inner corners of my eye where I tend to be dark, and on the outer corner of my eye underneath my lower lash line, blending up and out with a sponge. This gives the eye a lifted affect. After trying both the famous Tarte shape tape and this ELF 16-Hour Camo Concealer in Medium Peach, I can honestly say I threw out my Tarte and haven’t looked back! This is a great product with very full coverage. Next, I swept on the LA Colors I Love Makeup Contour Palette in light medium. While I normally don’t contour my nose, this is a full face look for something that is a little extra, so I went there! I simply drew two straight lines up the bridge of my nose with a small eyeshadow brush. To help with placement, you can take the brush up following a line up from the inner part of your nostrils. This will help you get it close together without touching. Then, make sure you blend, blend, blend!
I then applied the Flower Beauty Flower Pots Powder Blush in shade Peach Primrose. I kept things peach to go with the contour shade. I started at my temples and brought the blush forward. In the past, people may have taught you to smile and apply blush to the part of your cheek that sticks out. However, once you relax, this part of your cheek falls and this can, in effect, drag your face down. By applying at the temples and blending in, this makes sure you look lifted and awake!
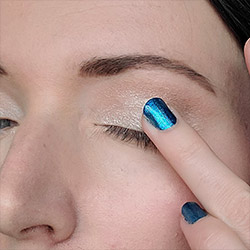
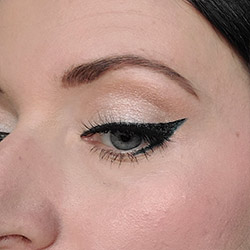
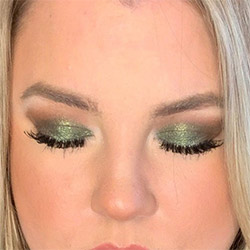 The wow factor of this look is the eyeshadow. I took the darker colors of eyeshadow in the ELF Eyeshadow Palette in Need it Nude and focused on the outer corner. Since I did not use eyeliner, I used the shape of the eyeshadow to create a subtle cat eye effect. I then patted the L’Oréal Infallible Eye Shadow in Golden Emerald on my eyelid with my fingers. Two layers made the look pop!
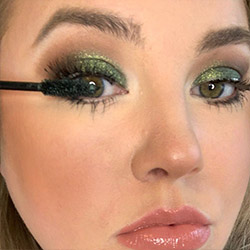
I finished off the looks with Ardell Demi Lashes, and once they dried, I blended everything together with L’Oréal Voluminous Mascara in Deep Green. It is less harsh than black and a fun way to add a little bit of unexpected color in. If you are newbie to lashes, I recommend the Ardell demi wispies. The band is light and bendable, which makes them easier to apply than a stiff banded false lash.
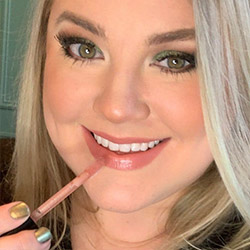 I then completed the look with the Flower Beauty Matte Lipstick in Naked Blush and the Revlon Super Lustrous Gloss in Rosy Future. Both paired wonderfully with a colorful eye, but I also think they would make great everyday colors and I will be adding them into my daily rotation!
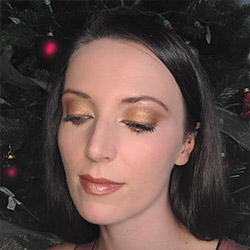
Shimmering Bronze-y Gold


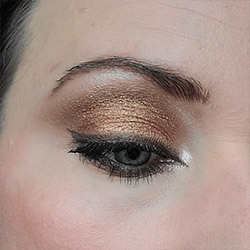
Tanya: For this look, I started with all the same basics of my first look: Foundation, concealer, and eyebrow pencil. After applying primer to my lids, I first applied the base gold layer using the L’Oréal Colour Riche Pocket Palette in Boudoir Charme. The four colors in this palette are all beautifully shimmery. Then, using the darker brown color in the palette, I brushed this into my crease as well as brought it down the outer corner of my eyelid in a V shape.
Essentially the eyeshadow version of a cat eye. Using a fluffier brush, I just blended the edges so they wouldn’t be sharp lines.
Using L’Oréal Infallible Eye Shadow in Amber Rush, I dabbed this super shiny bronze just in the middle of my eyelid and toward the outer edge so that the gradient went from gold to bronze to brown. Then with a very fine tipped brush, I dipped it in the L’Oréal Infallible Eye Shadow in Iced Latte that I used in my other look and put it at the inner corners of my eyes as a little highlighter. I also added a swipe of this up to my browbone. (Can you tell I’m in love with these eye shadows?) Underneath my eyes to achieve a very light smoky look, I went back to the pocket palette and used the darker brown with a liner brush to line just under my bottom lashes.
Next up was eyeliner, and I used Covergirl Ink It Eyeliner in Cocoa Ink. This was another newbie for me, and I love how smoothly it glides on. I was able to create a nice thicker link with this pencil, which is what I wanted, but you could definitely achieve a thinner line with this eyeliner as well. I used a smudge brush to smudge out the line just a little bit.
 This time I wanted to see what the mascara could do without fake lashes, so after curling my lashes I applied Maybelline The Falsies Mascara in Very Black. Honestly, one layer was enough for me to see how awesome this mascara is, but I did a quick second layer on the top lashes and, yeah – definitely don’t need false lashes after that!
For blush I used the Kokie Blush Up palette in Blushing, the peachier color on the right. I tend to stick to the peachier tones in my blush so that my paler face doesn’t disappear with bolder eyes or lips. I dabbed my blush brush into the gold eyeshadow from the L’Oréal pocket palette and did a quick sweep over the cheekbone, just giving it a very slight shimmer when you turn your head in the light.
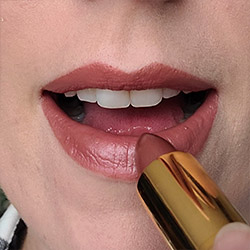 My lipstick was comprised of 3 steps. First, I used Revlon Colorstay Lip Liner in Nude. Second was filling in my lips with Revlon Super Lustrous Lipstick in Smoky Rose.
And lastly, I dipped my finger in the Kokie Soft Glow Highlighter and dabbed it just in the middle portion of my lips to give this a slight shimmery 3D effect that tied in eyes, cheeks, and lips all with shimmer and gold tones.
 Last but not least, a quick few spritzes of L’Oréal Infallible Pro-Spray & Set meant that my makeup would last all day!
What are some of your favorite go-to items? Let us know in the comments!